I measured the spring rate of several original but well-used sear springs and I found the spring rate to be on the order of 38 - 42 lbf/in. After a fair amount of searching I discovered a suitable replacement spring with a rate of 15 lbf/in. The following table lists comparable specifications for the original spring and the replacement spring.
| Original Spring |
Replacement Spring |
|
| Free Length (L0) | 0.772 in | 0.875 in |
| Outside Diameter (D) | 0.183 in | 0.180 |
| Wire Diameter (d) | 0.032 in | 0.026 in |
| Spring Rate (k) | 38-42 lbf/in | 15 lbf/in |
| Assembled Length (L1) | 0.616 in | 0.616 in |
| Initial Compression (L0-L1) | 0.156 in | 0.259 in |
| Spring Force (F=k*[L0-L1]) | 6.2 lbf (k=40) | 3.9 lbf |
| Trigger Pull | 6.0 to 9.0 lbf | 4.5 to 6.0 lbf |
The replacement spring is available from McMaster-Carr Supply Company or from W.W. Grainger. It is available only in packets containing five springs. The McMaster-Carr part number is 9434K32. The Grainger part number is 1NCB2.
Replacing the spring is preferrable to the alternative solution to heavy trigger pull: cutting coils from the original sear spring. Cutting coils from the sear spring will permanently and irreversibly alter it. These old springs are becoming difficult to find in good condition. Better to replace it and save it than to alter it and risk ruining it.
The sear spring is really quite simple to replace. After ensuring that the weapon is unloaded, remove the action from the stock. Remove the bolt from the receiver. Also remove the trigger guard/magazine assembly. Now remove the cross pin that will be found behind the rear bridge of the receiver and just below the wood line. The trigger and the sear assembly can now be removed from the underside of the receiver.
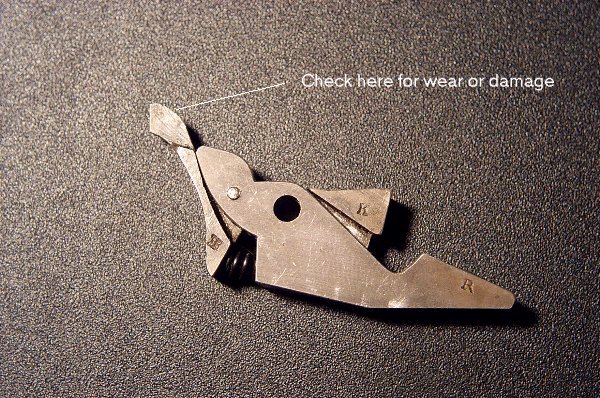
First, study the arrangement of parts so that you know where each part goes BEFORE you take it apart. In the picture above, the ejector is on the left, the sear body has the large hole, and the sear is on the top, just to the right of the large hole. Notice the small pin toward the left side of the sear body. A few coils of the spring can be seen in the space between the ejector and the sear body.
Now very carefully drive out the small pin in the sear assembly. The spring is under compression so be careful to contain any parts that may try to take off! After removing the pin, the ejector can be removed from the assembly. The spring can now be withdrawn from the sear body. The sear itself may also separate from the body.
To reassemble the sear assembly, begin by starting the pin into one side of the body. Now reinsert the sear if it has come out of the body. Insert the new spring. It is longer than the original and more flexible so it may take some manipulation to get it to stay in place. Finally, using at least three hands(!), hold the ejector in its position, compressing the spring, and drive the pin home. It's not as easy as it sounds. The spring will appear to be bowing out of the assembly. Don't worry about this as the spring is more compressed in its resting state while the sear assembly is assembled onto the receiver. Congratulations, you've just replaced the sear spring.
Reinsert the trigger into its recess on the underside of the receiver. Position the sear assembly on the receiver then reinstall the cross pin. Now finish reassembling the weapon.
Try the trigger. I think you will be pleased with the change.